
By default docker creates a single host bridge network which allows all docker containers on the same host to communicate with each other and with the host.
if you use the command docker network ls on a new docker installation you will see three networks.
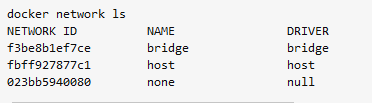
When you use the run command to run a container without using the network switch the container will use the default bridge network.
On the bridge network container apps can communicate using the IP address of the container.
Containers on the bridge network are given an IP address from the address pool. This is usually 172.x.0.0 range.
For applications on the main network to access applications in a container requires that the container must map/publish ports.
This is why you see container run commands looking like this
docker run -it –name mos2 -p 1883:1883 -p 8853:8883
The Host network switch
You may see run commands looking like this (mosquitto example):
docker run -it –name mos2 --network=host
You should notice that no port mapping is being used but applications on the main network can access the mosquitto broker on any ports that mosquitto has been configured to use.
This is very similar to starting mosquitto normally( without docker).
The IP address of the broker is the same as the IP address of the host.
However this option will expose all listening ports in the container and so it is not often used except for container Applications that need to listen to network broadcast messages.
Broadcast messages can’t be forwarded using the bridge e.g a DHCP server –ref .
Home assistant on docker requires this option for device discovery to work.
Creating additional Networks
You can also create your own networks using the docker network create command. example
docker network create -d bridge my-net
Where my-net is the name of the network.
When you run a container you can connect it to the network using the network= switch. e.g
docker run --network=my-net -itd --name=mos eclipse-mosquitto:2
You can also connect a running container to a network using the connect command and also specify an IP address the container will use on that network if desired. e.g.
docker network connect --ip 172.19.1.4 my-net mos
On a network containers can communicate using the IP address or the container name.
So for example if you start two containers using the –-name switch set to c1 and c2 then from container c1 you can ping c2 using the command :
ping c2
and vice versa.
Example Docker Network
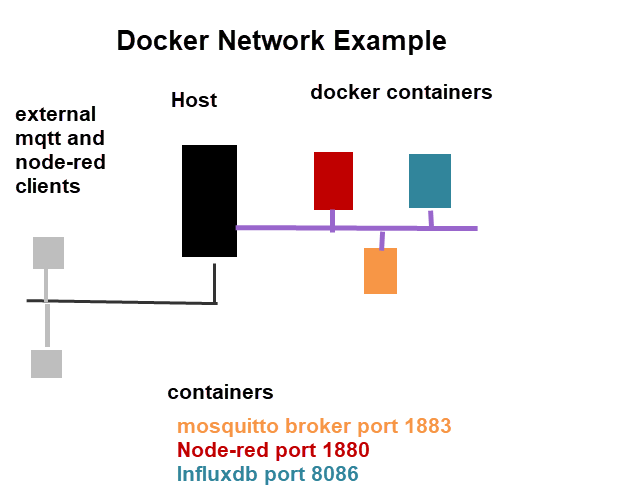
In the example docker network as shown in the diagram below we have 3 containers
- A mosquitto broker using port 1883
- A node-red Server using port 1880
- An influxdb database using port 8086
Requirements
1. Clients on the host network need to connect to the mosquitto broker and the node-red server.
2. The node-red server needs to connect to the influxdb database
Setup
1. We need to map ports for the mosquitto broker and node-red server but not the inflluxdb database.
2. The container for the influxdb database should have a fixed IP address which requires a user defined network.
3. Create a user defined network and place all 3 containers on it.
4. For completion give all containers a fixed IP address (optional).
Common Questions and Answers
Q- Do I need to create my own network?
A- No it is usually only done when running multiple containers that need to be isolated from each other or containers that require a fixed IP address.
Q-If I don’t map ports will my applications still work?
A- Yes but will only be accessible to containers on the same network and not to users on the host network.
Related Tutorials and Resources: