
Many networks will have a local MQTT broker (edge broker) which also connects to a cloud broker.
The broker could be configured as an MQTT bridge and relay messages to the cloud broker.
However What if:
- The broker doesn’t support Bridging (Aedes)
- You only want to send changed messages for example?
- Your cloud broker wants JSON formatted messages but the sensor only sends simple text.
- You need to aggregate messages.
Using a client to republish the messages gives you far more control over what is sent between the edge broker and the cloud and doesn’t require any broker changes/administration.
The actual idea for this project came creating a thingsboard dashboard and I needed to send data in JSON format.
However the sensor simulators that I had created didn’t do that, and so I had to modify the sensor code accordingly.
Fortunately this was easy as I had written the code, but if they were real sensors then it would have been much more difficult.
In this project we are going to create a variety of python client bridges with varying degrees of functionality.
This is an open ended project and so if you have any ideas then let me know and I will try to incorporate them.
Currently I have plans to build
- A basic bridge
- A bridge for multiple brokers
- An aggregating bridge
Part 1 -Simple Bridge
How it works
The script runs on a client machine and republishes messages from one broker (the edge broker -broker1) to the other broker (cloud broker -broker2) as shown in the schematic below:
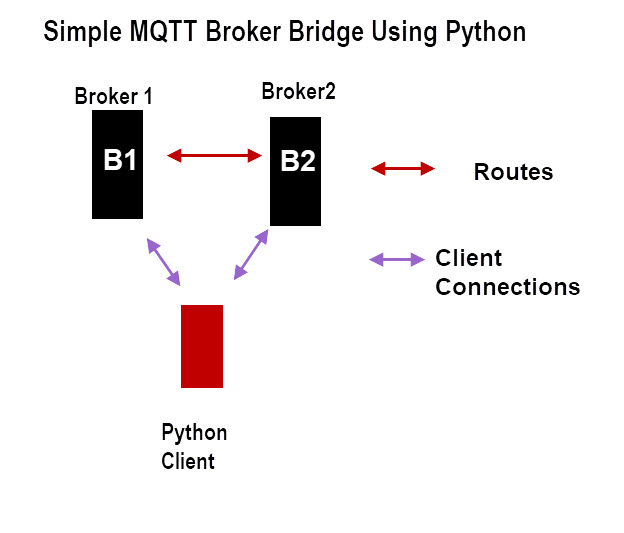
This works similar to the Mosquitto bridge and uses the same topic format.
The Mosquitto bridge also uses clients to do the bridging but they are built into the Mosquitto broker.
In the user edit section you will be able to change the brokers and importantly the bridge topic and direction.
Broker1 is the originating broker and broker 2 the destination broker.
Examples:
Example1:
bridge_topics=[“sig/#”,”0″,”in”]
Means bridge topics sig/# to broker1 from broker 2 and nothing from broker 1 to broker 2 using QOS of 0.
bridge_topics=[“sig/#”,”0″,”out”]
Means bridge topics sig/# to broker2 from broker 1 and nothing from broker 2 to broker 1 using QOS of 0.
Important Note: the script uses a flag to tell the broker that the client is acting as a bridge.
client_c1.enable_bridge_mode()
Video
Code

Part 2 Aggregating Topics
In part2 we will develop our bridge so that it can aggregate sensor data into a single payload.
Currently only a single topic tree is supported and aggregation works in one direction from broker 1 (edge) to broker 2 (cloud).
Simple bridging works in both directions as before.
The idea here is to combine several sensors on to a single topic as shown in the schematic below:
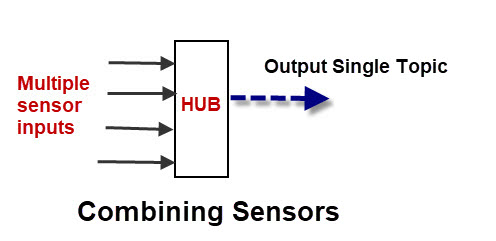
The script waits x seconds (configurable) before publishing to the outgoing broker aggregating the outgoing message in a JSON string containing an array of objects.
The incoming topic tree(to broker 1) would look like
mysensors/#
Message on topics mysensors/s1, mysensors/s2 etc would be forwarded to the destination broker on topic mysensors/combined by default but the outgoing topic is configurable.
The message payload would be structured as a dictionary object
{S1:payload1,S2:payload2}
Republish Only
If the topic is marked non aggregating then the message is re-published unchanged.
Messages are republished immediately.
Settings
The following settings need to be configured to suit your environment
- broker names
- combined topic name. Should be a sub topic of main topic tree
- publish interval -will publish every 10 secs (default)
- bridged topic
The Bridged topic setting uses the same structure as before with 2 new elements.
A designation of A means this broker will aggregate messages and NA means non aggregating.
When aggregating the messages will be combined and sent as a JSON object, when either the time interval expires or a message arrives on a topic that already has a message waiting to be sent.
In this case a message is sent, and then the new message is added to the store.
There are really only two settings that make sense and they are covered below.
The bridge topic is a topic tree e,g sig/# and the combined topic must be a sub topic of this main topic e.g sig/combined
Example 1
bridge_topics=[“sig/#”,”0″,”in”,”NA”,”NA”]
This functions as a simple bridge
We have an in route which means messages sent to broker 2 will be bridged to broker 1. We also have aggregating enabled on broker 2 which means that the messages are expected to be aggregated.
Messages sent to broker 1 will not be bridged
Example 2
bridge_topics=[“sig/#”,”0″,”both”,”A”,”A”]
Messages sent to either broker on topic sig/# are bridged and aggregated and sent the other broker on topic sig/combined
Broker 2 is aggregating and so will expect to see messages on the combined topic sig/combined and in JSON format .If the messages are not they are discarded
The messages are split into topic and message and to sent to broker 1.
this means a message of topic sig/combined with message={“s1″:”test”,”s2″:”test2″}
will be split into two messages and sent to broker 1 on topic sig/s1 with message test and sig/s2 with message test2
DownLoad
Quick Questions
Q – Your main topic is house/#. What should your combined topic be?
Q- Your setting is bridge_topics=[“sig/#”,”0″,”in”,”A”,”NA”] . What happens to messages sent to broker 2 on sig/S1 and sig/S2?
Q- With the same configuration as before what would happen to a message sent to sig/combined.
Q- With the same configuration as before what would happen to a message sent on sig/S$ with a payload of Test.
Answers
A1 -house/combined
A2 -They would be bridged
A3 – It would be bridged
A4- It would be sent to broker to on the topic sig/combined and the format would be a JSON object looking like {“S4″:”Test”}
Part 3-
Currently no part3 planned as I have received insufficient feedback.However this could change in the future.
Related Tutorials and resources
- Mosquitto MQTT Bridge -Usage and Configuration
- Configure a Mosquitto Bridge With SSL Encryption
- MQTT Topic and Payload Design Notes
It would be really nice to learn from an example of bridging for multiple brokers!!!
IS the bridging 1 to x. or a mesh type arrangement.
rgds
steve
Interesting idea, will try it in time, specially as broker one cant send to broker two only broker two can do 2ways.