
![]() You can configure the mosquitto broker using a configuration file.
You can configure the mosquitto broker using a configuration file.
The default configuration file is called mosquitto.conf and it is used by the mosquitto broker when started as a Linux daemon or Windows service.
You will find the mosquitto.conf file in the /etc/mosquitto directory on Linux, and in the c:\mosquitto\ directory on Windows.
Note: the Windows install lets you choose the directory.
Important: In order for changes in the mosquitto.conf file to become effective you must restart the mosquitto broker.
However many changes can become effective without restarting the broker and are marked with the comment- Reloaded on reload signal in the manual.
MQTTv5 and MQTT v3.1.1
The mosquitto broker supports both client types and so some of the settings in the configuration file will only affect MQTTv5 clients.
Listeners
It is possible to configure a mosquitto broker to listen on several ports at the same time.
This is very useful if you want your broker to support multiple protocol configurations. The most common are:
- MQTT
- MQTT +SSL
- MQTT +Websockets
- MQTT + Websockets +SSL
The default configuration uses a default listener which listens on port 1883.
To configure the broker to listen on additional ports you need to create extra listeners.
If you look at the settings you will find that they are divided into sections and some of the settings affect the entire broker instance, whereas others affect a particular listener.
A major change introduced in version 1.5 allowed many configuration settings that were previously global to be made on a per listener basis.
However to maintain backward compatibility this option must first be enabled.
per_listener_settings [ true | false ]
Setting to true will affect the following configuration options.
password_file, acl_file, psk_file, allow_anonymous, allow_zero_length_clientid, auth_plugin, auth_opt_*, auto_id_prefix.
The most important is the ability to configure authentication and access control options on a per listener basis and not globally as was the case pre version 1.5.
IPv6
When you add a listener in the mosquitto.conf file mosquitto will listen on that port for IPV4 and IPv6 traffic.
you can select the IP version by using the socket_domain option
So
listener 1883
will listen for both IPV4 and IPv6 on port 1883 and
listener 1883
socket domain ipv6
will listen for only IPv6 on port 1883 and
listener 1883
socket domain ipv4
will listen for only IPv4 on port 1883
Default Settings
All settings have a default setting that is not set in the configuration file but is internal to mosquitto. Settings in the configuration file override these default settings.
Settings Notes
When consulting the Mosquitto.conf manual you will come across two important setting properties. They are:
- Global – This means that they apply to all listeners
- Reloaded on reload signal. – Changes can be implemented while mosquitto is running by using a reload.
Global Settings
These settings are global and generally reloaded on reload signal.
These include logging and file locations. Logging is covered in more detail in the Logging tutorial.
They also cover persistence settings which enable mosquitto to keep messages and status information, like retained messages, across restarts.
per_listener_settings [ true | false ]
allow_anonymous [ true | false ]
persistence [ true | false ]
persistence_file file name
persistence_location path
autosave_interval seconds
retain_available [ true | false ]
user username
The user option allows you to run Mosquitto as a different user (Linux) by default it runs as the use Mosquitto.
Message Restriction Settings
There are a number of messages restriction settings available.
These settings are global settings and affect all listeners. Important ones are:
max_packet_size value
message_size_limit limit -MQTT v5 clients
max_inflight_bytes count
max_inflight_messages count
max_queued_bytes count
max_queued_messages count
Authentication Settings
Allows users to connect without a password or enforces username/password authentication.
This can be configured on a per listener basis if per_listener_settings is true. The default is true provided no other security options are present. If for example a password_file or psk_file is set then it defaults to false.
allow_anonymous — [ true | false ]
Associated with the allow anonymous setting is the password file settings.
password_file file path
If allow anonymous is false then you need to create a password file and set the path to the file. This is covered in the using username/password authentication tutorial.
This can be set on a per listener basis and is reloaded on reload signal.
This means that you do not need to restart Mosquitto when you add new users to the password file.
TLS /SSL Support
Provided through certificates or pre shared keys (PSK) and is configurable on a per listener basis and doesn’t require the per_listener_settings to be configured.
This is covered in more detail in configuring SSL on Mosquitto
Access Control Restrictions
You can configure mosquitto to restrict access to clients using ACL (access control lists).
Access control list restrictions are set using the setting:
acl_file file path
and can be configured on a per listener basis if per_listener_settings is true.. They are reloaded on reload signal.
This means changes made to the access control lists can be applied without restarting the broker.
See Using and testing ACL restrictions in mosquitto for more details
Per Listener Settings
There are many settings that apply to listeners regardless of the if per_listener_settings setting.
Default Listener
This listens on port 1883 by default and doesn’t usually require configuration. However you can set the address the listener listens on using the bind_address setting and interface using the bind_interface setting (Linux only) and also the port number using the port setting.
If you configure the listener to use websockets using the protocol setting then you can also configure the broker to act as a simple http server and set the directory where the files are located using the http_dir setting.
Note: The manual doesn’t recommend using the default listener if you are configuring additional listeners.
The following is a list of other settings taken from the manual that should give you an idea of what can be configured.
bind_addressaddressbind_interfacedevicehttp_dirdirectorylistenerport[bind address/host]max_connectionscountmaximum_qoscountmax_topic_aliasnumber-MQTTv5 onlymount_pointtopic prefixportport numbersocket_domain[ ipv4 | ipv6 ]protocolvalue(MQTT or websockets)use_username_as_clientid[ true | false ]websockets_log_levellevelwebsockets_headers_sizesize
Bridge Settings
Mosquitto can be configured to act as a bridge so that it will rely messages to another broker there is an entire section that covers these settings.
Bridges can also be configured to use authentication and SSL.
You can find more details in configuring Mosquitto as a bridge tutorial
Starting Mosquitto – Notes
When starting mosquitto for the command line unless you specify a configuration file none is used. Therefore
mosquitto
mosquitto -v
and other similar commands start mosquitto without using a configuration file.
If you install mosquitto as a service on Windows then it starts using the mosquitto.conf.
The Linux install also configures the Mosquitto broker to start automatically using the mosquitto.conf file..
Important: When testing mosquitto you need to stop the mosquitto instance that has been started when the machine booted, and then start your own instance from the command line.
Editing The File Configuration File
When testing I would recommend you create a configuration file in your local folder and use that.
I don’t recommend that you copy the default mosquitto.conf file as it contains all possible settings which are commented out, and if you do make change to it it is difficult to locate them.
However It is very useful for documentation as it contains help for all of the settings.
You can use a normal text editor to edit the file.
If you do use it then put all of your settings at the top of the file, and use the commented out section as documentation.
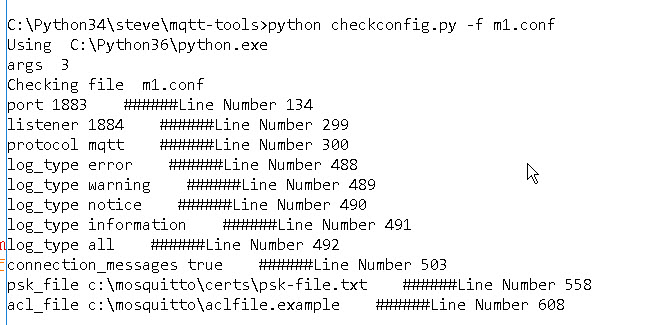
If you do edit the individual sections then I have created a simple Python script that will display only the un-commented settings from the file.
When you run it you will see something like the screen shot below

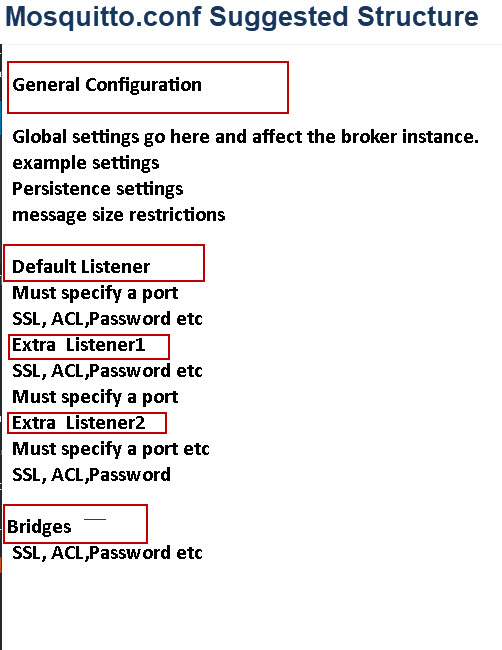
File Structure
There is no imposed structure although certain settings mus appear before others e.g you must specify the per_listener_settings setting before you create listeners.
The structure I use is shown in the sketch below:
Restarting Mosquitto or Reloading Config Files
If you update mosquitto configuration files you can restart mosquitto to pick up the changes.
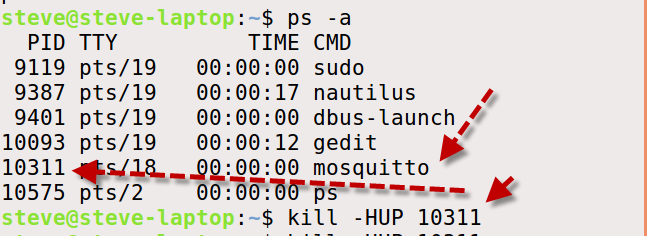
However on Linux you can also reload the configuration files without restarting the broker by sending the HUP signal as follows:
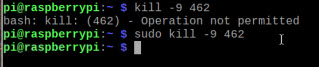
kill -HUP PID # where PID is the process ID as shown below:
If you look at the console it should show that the config files have been reloaded.
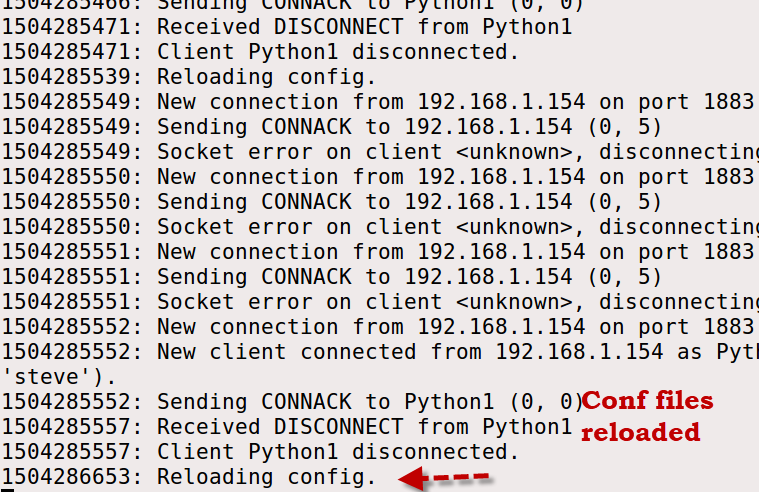
Important Note: Not all configuration file changes will be picked up on reload you will need to consult the manual
I have created a table showing the settings and what requires a restart that you can use as a quick reference.
Configurations Examples
The best way to understand how to use the configuration file is to see some examples. The following shows some typical configurations.
Note: I don’t include logging or persistence in these examples so as to keep them short and simple, but I do I my real files.
Mosquitto Broker Listening on Several Ports
The mosquitto broker can be configured to listen on several ports at the same time.
However this configuration doesn’t mean that you have virtual brokers. as most of the configuration is shared.
Example 1- Listen on ports 1883 and 1884
Section Default listener
port 1883
Section Extra listeners
listener 1884
Example 2- Listen on ports 1883 and 1884 without default listener
Section Default listener
Section Extra listeners
listener 1883
listener 1884
Example 3- Listen on ports 1883 and 8883 (SSL)
Section Default listener
port 1883
Section Extra listeners
listener 8883
Certificate based SSL/TLS support
(Windows)
cafile c:\mosquitto\certs\ca.crt
keyfile c:\mosquitto\certs\server.key
certfile c:\mosquitto\certs\server.crt
(Linux)
cafile /etc/mosquitto/certs/ca.crt
keyfile /etc/mosquitto/certs/server.key
certfile /etc/mosquitto/certs/server.crt
Example 4- Listen on ports 1883 and WebSockets (SSL)
Section Default listener
port 1883
Section Extra listeners
listener 9001
protocol websockets
Example 5- Listen on ports 1883 and 1884 with authentication
Notes:
Global
per_listener_settings true
Section Default listener
port 1883
Section Extra listeners
listener 1884
allow_anonymous false
password_file file path
Example 6 – Listen for IPV6 traffic only
listener 1883
socket domain ipv6
Example 7 – Listen on a particular IP address (ipv4 only)
listener 1883 192.168.1.23
#note this also disables ipv6
Example 8- Restrict number of connections on default listener to 1000
Global
max_connections 1000
Useful Linux Commands
To stop Mosquitto when running as a daemon:
ps -aux | grep mosquitto

pgrep mosquitto

sudo kill -9 PID (that you get from above command)
[googlead]
Resources:
- Mosquitto.conf Manual Page
- Mosquitto Change log shows what was changed in what version
Related Tutorials
- Mosquitto MQTT Bridge-Usage and Configuration
- Understanding and Configuring Logging – Mosquitto Broker Configuration
- Mosquitto SSL Configuration -MQTT TLS Security
- Configuring and Testing MQTT Topic Restrictions
- Mosquitto Username and Password Authentication -Configuration and Testing
- How to Install The Mosquitto MQTT Broker- Windows and Linux
Hi Steve
just a follow up to my previous comment, one of those where 5 minutes after hitting send you figure it out. Turns out I had per_listener_settings set to true but forgot to set each listener up with authentication and password !!
this seems to work Ok
listener 1883
allow_anonymous false
password_file C:\Program Files\mosquitto\UserList.txt
listener 1884
allow_anonymous false
password_file C:\Program Files\mosquitto\UserList.txt
Thanks again for a great and extremely website.
Andy
Glad you found the problem.
Rgds
Steve
Hi Steve
Thanks for all your help in this fantastic website, I would never have been able to get as far as I have without it!!
I have come across something I haven’t been able to resolve and I know you touched on something similar in one of you’re previous responses, but I still cant resolve my own issue.
I am struggling to add multiple listeners e.g.
listener 1883
listener 1884
It only seems to allow one listening port, that port being the last one in the list, so in this case it would be 1884. If I swapped the order to
listener 1884
listener 1883
It would only monitor on 1883, but I can’t get it to monitor both..
I can use
listener 1883
port 1884
which will monitor both ports, but again if I add more, only one last listener or the last port is used?
I’m just wondering if I am misunderstanding how this part works? In summary I thought I’d be able to just add a list of specific listeners to the config and all the ones on the list would be monitored.
Many thanks
note I’m using mosquitto version 2.0.18 under Windows.
After having mosquitto running on a Raspberry Pi, I’m trying to get it going on a Ubuntu machine. I ran into an issue that I can’t find any data on.
A config file made with “sudo nano /etc/mosquitto/yada-yada-yada…” fails with an error reading the config file stating that “#” on line one – that is, the first character – is an invalid configuration variable. After much thrashing around, I used the file command to find out that the config file is in UTF-8 with BOM (byte order marker) bytes first. Using iconv to change the character encoding to UTF-8 without the BOM gets rid of the error.
So character encoding may matter.
Now I’m digging through why sudo mosquitto -c /etc/mosquitto/conf.d/yada-yada-yada just starts, but never writes back any of the verbose stuff. I don’t know if that’s an encoding issue or something else. I hope this may help someone.
Hi
What is in your config file?
rgds
steve
I got wrapped up into stripping out blank lines and comments so the config file was easier to read, thought “hey, I didn’t try…” and spent the next several hours following the tangled rabbit trails.
I know the rough area of why it wasn’t working, but not exactly. It’s a permissions problem, and I’ve trailed back through the various files, users and permissions and have something running now. But I still can’t get it to run with persistence and logging enabled in a way that matches my reading of the mosquitto configuration manual.
What I got to run was to create a new user “mqtt-user” for the fallback user from a sudo start, along with the requisite home directory. If I read it correctly, the user I was trying to use (“mosquitto”) only works on the local host; so I changed users.
Still no function, and the mosquitto.log file showed being unable to write the pid files and mosquitto.db. Hours of futzing with chmod, chown, chgrp, etc. got nowhere with the files in /var/(anything) in spite of setting the /var/*/mosquito directories to rwxrwxrwx. I still don’t understand exactly why.
Putting the .db, .pid, and .log files into the home directory of mqtt-user finally allowed the thing to run from the command:
sudo mosquitto -c /etc/mosquitto/mosquitto.conf -v
Your comment is correct – many of the problems with adopters is tied up in permissions.
In the documentation the locations of the persistent data and logs assume that mosquitto runs as the mosquitto user as the permissions are set for that user by the install.
When testing I place all my files in my test folder and run mosquitto as my user.
If you want to use the locations from the docs for the pid,persistence data nad logs then you need to run mosquitto as the mosquitto user by user the command.
sudo -u mosquitto mosquitto myconfig.conf
You might find this useful
http://www.steves-internet-guide.com/tips-for-testing-the-mosquitto-broker-on-linux/
rgds
steve
Hi Steve,
Many thanks for taking the time to put this website together. I have a question that I could not find an answer to. I’m a radio ham and I have 2 mesh networks, one on 433MHz and one on 868MHz. I want nodes on the 433 mesh to see the ones on the 868 mesh and pass messages between the 2 meshes, and vice versa.
I have a mosqitto MQTT server and both meshes are subscribed to the same topic “relay”, but the the modes and messages on one mesh are not showing up on the other one. Any suggestions?
Are you using the default config file is yes then see the note at the top of this article
http://www.steves-internet-guide.com/mosquitto-broker/
If that isn’t the case can you pub and sub on one mesh and see messages?
Rgds
Steve
Hello Steve. Thanks for your amazing effort on this site, I learnt a lot from you.
I developed an IoT project which I have to use a very unreliable internet connection on the edge device. I have an MQTT Broker running on the server, and I listen it with my Python script. I split my data into chunks 1024 bytes and I have 20 chunks on average for every wake up.
However, when I lose connection on the edge device while publishing chunks, even if it connects back in 5-6 seconds, I face with a weird issue: In python, my “on_connect” payload is triggered, but there is no message on the topic that I have subscribed to. It is impossible, because I only have one topic that I publish messages to.
I could not find what to modify in the configuration to set a timer or implement some algorithm to recover chunks if needed. Can you help me on this?
Hi
Is it the publisher that fails while sending?
Rgds
Steve
First, I am sorry. The part where I said “In python, my “on_connect” payload is triggered, but there is no message on the topic” is wrong. I debugged it.
I was trying to handle this issue for more than a day and just after I asked this question here, I solved it. It was about a line of mistaken code. There still are some problems on publisher side but I am not sure why they exist. As soon as I figured it out, I’ll update here.
Thanks for your rapid reply, as well!
Hey, I have setup my mqtt broker of Eclipse Mosquitto by following your guide.
I want the broker to use mqtt version5 and not version 3 or 3.1. How can I make that happen what changes do I need to do in the conf file to achieve this?
My project idea is to make a mqtt fuzzer for version5 but I am not able to convert the version to 5 as it defaults to version 3.1.
Thank you.
Hi
No changes are needed on the broker. When you connect using a client then you need to specify the protocol. Currently all clients default to v3.1 unless you set it explicitly.
Rgds
Steve
How can Specify it to default my client to use version5 of mqtt? any example is available ? As I will be required to produce valid mqttv5 packets so can I achieve this via PAHO library??
And like by default 1883 listener port is open..So the same port will also accept mqttv5 requests from the client?
It depends on your client here is the configuration for python
http://www.steves-internet-guide.com/python-mqtt-client-changes/
what client are you using?
Rgds
Steve
I am using Python Paho client only.
import paho.mqtt.client as mqtt
This is my import statement.
Thank you for sharing the link.
Regards.
Hi Steve,
I have followed your tutorials and I am making progress. However, I tried to use multiple “ports” as you mentioned in Section Extra listeners: listener 1883; listener 1884 and received the following errors, so I only use “port 1883” now, which seems to be working. Any suggestions or ideas as what I maybe missing here?
Client (null) sending CONNECT
Client (null) received CONNACK (5)
Connection error: Connection Refused: not authorised.
Error: The connection was refused.
Thanks,
Givi
Hi
It is an authorisation issue. The allow anonymous an be used before any listener statement an it will apply to all listeners or in each listener statement in which case it will apply to that listener.
apply to all
allow_anonymous
listener 1883
listener 1884
or
only allow anonymous on 1883
listener 1883
allow_anonymous
listener 1884
Rgds
Steve
Hi Steve,
Followed your instructions and my ACLFILE and PASSWD files working just right on multiple ports. Now, I would like to move on to SSL/TLS and port 8883. Would you please let me know which lines/statements in “mosquitto.conf” file should be commented out and which one should be uncommented to accommodate that?
Hi
From you question I gather you are using the mosquitto.conf file with all of the settings commented out.
I don’t recommend doing that.rename it as it si usful to keep so you can see all of the possible settings. Create a new one and add in the entries and save it as mosquitto.conf.
Below is an example file:
# Place your local configuration in /etc/mosquitto/conf.d/
#
# A full description of the configuration file is at
# /usr/share/doc/mosquitto/examples/mosquitto.conf.example
persistence true
persistence_location /var/lib/mosquitto/
log_dest file /var/log/mosquitto/mosquitto.log
include_dir /etc/mosquitto/conf.d
log_type error
log_type notice
log_type information
log_type debug
log_type websockets
connection_messages true
log_type all
log_dest stdout
allow_anonymous true
listener 1883
listener 8883
cafile /etc/mosquitto/certs/ca.crt
#capath /home/openest/certs/ca
# Path to the PEM encoded server certificate.
certfile /etc/mosquitto/certs/server.crt
# Path to the PEM encoded keyfile.
keyfile /etc/mosquitto/certs/server.key
I’m trying to run mosquitto on my Ubuntu Laptop. The system finally installed Mosquitto 2.0.15 and I’m using ../conf.d/default.conf which (for the beginning) only specifies:
listener 1883
listener 8883
allow anonymous true
The Laptop is located behind a FritzBox which I can access via my personal MyFritz-URL.
There is no problem to connect Mosquitto from another Laptop in the LAN with a Python script addressing my MyFritz-URL.
However I’m unable to connect Mosquitto from a Smartphone App (MyMQTT) if I use the MyFritz-URL !!!
Note to mention that I can connect the broker if I specify the actual IPv4 address (which changes day by day) . Also I’m able to connect other (external) brokers with the Smartpone-App (either via port 1883 or via SSL-port 8883).
Finally I have to mention that my ufw firewall allows Anywhere-access to ipv4 and ipv6 on both ports.
Do you have any idea? Do you know anybody else who had problems connecting a Smartphone App to Mosquitto in a FritzBox-LAN?
Thanks in advance
Juergen
Hi
Have you enabled port forwarding on the external router?
Rgds
Steve
Hi Steve
yes port-forwarding is enabled in the FritzBox…
Have you enabled web sockets on the mosquitto broker or is the smart phone app using just MQTT+SSL
Rgds
Steve
The Smartphone-App from PlayStore simply comes with port 1883, so I assume that it simply uses MQTT without SSL.
I also have my own Smartphone-App where I use the Paho Client with the following Kotlin code:
class MQTTClient(context: Context?,
serverURI: String,
clientID: String = “”) {
private var mqttClient = MqttAndroidClient(context, serverURI, clientID)
private val defaultCbConnect = object : IMqttActionListener {
override fun onSuccess(asyncActionToken: IMqttToken?) {
Log.d(this.javaClass.name, “(Default) Connection success”)
}
override fun onFailure(asyncActionToken: IMqttToken?, exception: Throwable?) {
Log.d(this.javaClass.name, “Connection failure: ${exception.toString()}”)
}
}
…
This code always fails in onFailure() giving the following stack-trace:
java.net.ConnectException: failed to connect to j9g.myfritz.net/2a05:4540:6f00:8899::1c9e (port 1883) from /2a05:4540:6f1c:c200:8a5:8b3a:5bb1:f8f1 (port 38242) after 30000ms: isConnected failed: ECONNREFUSED (Connection refused)
(broker address and real IPv6 addresses have been modified…)
Connection refused usually means wrong port or IP address or port blocked. Can you contact me on the ask steve page and I will look into it further.
Rgds
Steve
Typo in the article?
In the section ‘Authentication Settings’ where it states “If allow_anonymous is true then you need to create a password file” — surely it should be “..is false..”?
Well spotted I have corrected it. Tks
Steve
hello,
I want to change the mosquitto.conf file, but I can only open it in read-only.
What can I do?
I can’t change anything in the file system
hello,
I want to change the mosquitto.conf file, but I can only open it in read-only.
What can I do?
On Linux I copy it to my home folder and then change the permissions on it. If you can’t do it then simply copy the content and paste it into a new file and delete the old file. Once you are finished just sudo cp mosquitto.conf /etc/mosquitto/mosquitto.conf
When testing I test using the conf file in the local folder and start mosquitto manually with the -c switch.
rgds
steve
Thanks for the reply,
But I even can’t delete the file, I’ll get ‘acces denied’
I’ve got Debian running on my PI, may is this the problem?
How can I log in as Owner?
Have you tried using the sudo command?
rgds
steve
I’ve been setting up a test network using a Mosiquitto Broker and I have a device publishing date time components (yy-mm-dd-hh-mm-ss) to topic “DCNET/DT/” and subscribing to the same with the device and MQTT Explorer. Every 30 seconds the Broker pauses forwarding messages for 21 seconds then streams the paused messages and syncs up with the device current publish. I then have 30 seconds of real time publish and subscribe matching then the pause repeats. Could this be one of the config settings of the Broker?
Regards
Mark
No the broker doesn’t pause something else is going on. The broker will republish the message immediately and there isn’t a setting to tell it not to.
I would take a look at the broker console and see what is going on.
rgds
steve
Hi Steve! We are trying to connect our raspberry pi to our IOS swift app and are having difficulties finding the correct IP address to connect to the pi when attempting to setup MQTT. We tried all of the IP addresses given by the ifconfig commands and have come up unsuccessful. We even tried setting up a custom IP address on the pi itself and it still does not communicate with app. Do you have any ideas?
Is Pi running as a broker or client?
The latest version of Mosquito changed the default behaviour. See https://mosquitto.org/documentation/migrating-to-2-0/
By default you can’t connect from an external host. To get the equivalent behaviour as the default used to be, you must put in your config:
listener 1883
allow_anonymous true
I have been tripping over this for weeks trying to connect. Thank you!
Hi Steve,
I had problems configuring tls support and I found that tabs are not a good idea in mosquitto.conf
mosquitto wasn’t able to find the keyfile nor the server.crt. After hours of pulling hair I replaced tabs by
spaces – et voila …
This might be of interrest for all using tabs to make conf files looking a little bit better.
I used source code from github, version 2.0.12
Thanks for your great work!
Juergen
hi steve,i want to add user “nisun”,but it is say C:\mosquitto>mosquitto_passwd -c ./pwfile.examplt “nisun”
Password: Error: Empty password.,something wrong?please help me,thank you.
Looks like a simple typo
if i use C:\mosquitto>mosquitto_passwd -c -b ./pwfile.example “nisun” “password”,it is ok,so,if win7 not support?or bug?
Hi
I had problems I remember running those tools on windows xp I haven’t used them on win7 as I tend to use linux.
rgds
steve
good morning, steve,thank you for your help,but xp is too old.so i find the better way to run,TKS.bye!
Sorry the last message didn’t keep the formatting
Hi
Version 2 has security changes and only listens on the localhost you need to create a listener in the config file
listener 1883
Hey Steve,
Thanks a lot
Hello Steve,
I recently updated mosquitto 2.0.9 on my RaspPI running DietPi v7.0.2 without change anything else I’m getting Error: Address already in use.
Before this it was running fine accepting external connections, I definitely didn’t change it to local only mode.
Any ideas?
Regards
Ian
1616241556: mosquitto version 2.0.9 starting
1616241556: Using default config.
1616241556: Starting in local only mode. Connections will only be possible from clients running on this machine.
1616241556: Create a configuration file which defines a listener to allow remote access.
1616241556: Opening ipv4 listen socket on port 1883.
1616241556: Error: Address already in use
1616241556: Opening ipv6 listen socket on port 1883.
1616241556: Error: Address already in use
At beginning of the post the listed directory for linux the directory is /etc/mosquito, should be /etc/mosquitto? Later mentions in post reference /etc/mosquitto/mosquitto.conf.
Sorry typo. Thanks for that
Rgds
Steve
Hi , steve
SAme issue happening in my android phone . I am not able to connect to the Mosquitto Broker
“—1616241556: mosquitto version 2.0.9 starting
1616241556: Using default config.
1616241556: Starting in local only mode. Connections will only be possible from clients running on this machine.
1616241556: Create a configuration file which defines a listener to allow remote access.
1616241556: Opening ipv4 listen socket on port 1883.—”
please guide me
Thank you
Hi
It looks like a version 2 problem you need to add these lines to the config
listener 1883
allow_anonymous true
take a look at the intro on the tutorial here
http://www.steves-internet-guide.com/mosquitto-broker/
Hello
on the client side i have to start
rtl_433 -F json -M utc | mosquitto_pub -h 10.18.42.175 -p 1883 -d -t iot12-rpi3b-gw-433 -l
as soon i do close the Terminal, the Server with Node Red don’t get any message.
how/where to add the information to be called when the client restart or the terminal is closed?
and how to change the QoS setting to 1 or 2 on the client side?
have a nice day
vinc
Not quite sure what you are doing. Use the ask steve page and let me know in more detail
Hi,
I am a newbie to MQTT concept and am trying to use RaspberryPi as publisher for communication. I am using my Linux Machine with IP address 10.60.62.125 to run the mosquitto broker. And publisher code runs on RaspberryPi and subscriber code runs on my Linux Machine. In the publisher code, I am trying to connect the client to “10.60.62.125” which is not working and giving me connection timed out error after some time. So what should be the IP address I have to specify in publisher code? Any help?
Hi
You are using the correct address. However I notice that you are using the 10.x.x.x range for you network which is unusual. Can the machine you are trying to connect from (the client) ping the address 10.60.62.125?
Rgds
Steve
Hi Steve,
I’m biginner in this, now i created my certifcate with my local domain name, but when i run my client, which is created in javascript , it’s returning error like WebSocket connection to ‘wss://innocube:9001/mqtt’ failed: Error in connection establishment: net::ERR_NAME_NOT_RESOLVED
Hi
That looks like a name resolution error and not mqtt
My apologies for a simple question. I am a raw beginner trying to get home assistant working. Very frustrating process.
I flashed tasmota on a Sonoff basic and am trying to get HA to recognize it. I have installed Mosquito on HA but when I try to set up MQTT, i get an “unable to connect to the broker” error.
I have tried every up address I can find and really have no idea what or how to find the broker address.
On the machine that is running mosquitto open a command prompt ant type
ipconfig (windows) or ifconfig(Linux) it will show you the ip address
rgds
steve
I set up Sonoff PWRR2 with HA today. Just check that you have done these steps:
– set up mosquito to use passwords:
allow_anonymous false
password_file /etc/mosquitto/passwd
in mosquito.conf or any other config file in the conf.d subfolder
– create a user with password
sudo mosquitto_passwd -c /etc/mosquitto/passwd my_username
– test your config by publishing while you have a subscription running (assuming you are executing on same machine where mosquito is running)
mosquitto_sub -h localhost -t test -u my_username -P my_password
mosquitto_pub -h localhost -t test -m “hello World!” t -u my_username -P my_password
– configure tasmota to use Mqtt, set ip, port (1883), …, account:my_username, my_password, topic=my_topicname. (my_topicname must be unique for each device if you have several tasmotas)
– activate automatic discovery on your tasmota:
mosquitto_pub -h localhost -t cmnd/my_topicname/SetOption19 -m “1” -u my_username -P my_password
– add mqtt integration to HA, fill in ip, port (1883), my_username,my_password
The tasmota entities will appear on the MQTT tile of the integrations page
Hi Steve,
I am working on SCADA and it contains inbuilt MQTT drivers, and I am connecting with AWS server by using MQTT, So here mosquitto broker is running fine in services but I am little doubt on config file, the config file is commented but where I have to enter the broker details and port details exactly in the config file, can you please send me some example config file for my understanding purpose.
Hi
You don’t normally need to enter the IP address of the broker in the conf file as it listens on all ip addresses assigned to the machine the broker runs on by default.
When you add extras listeners you add them normally just using the port number.But you can add the ip address using
# listener port-number [ip address/host name]
e.g
listener 1884 192.168.1.68
For the default listener use
bind_address ip-address/host name
e.g
bind_address 192.168.1.68
rgds
Steve
Hi Steve,
I’ve updated config file for tls and still mosquitto is not listening on port 8883 when I give command “mosquitto -c mosquitto.conf”. Its not executing anything.
Can you use the ask steve page and send me a copy of the file
rgds
steve
hi steve,
thanks for this post. can please share tutorial or guide to make our own mqtt broker via python.thankyou
Hi
There is one used for testing here
https://github.com/eclipse/paho.mqtt.testing
rgds
steve
trying to run your script on Raspi:
import paho.mqtt.client as paho
ImportError: No module named ‘paho’
this is after I successfully installed it:
pip install paho-mqtt
If you have installed it it may be installed under a different python version but this is not usual on PI.
Take alook here
http://www.steves-internet-guide.com/python-notes/
Hi,
I got some data missing when connected IoT devices to the mosquitto I installed on Linux. But if I connect the devices to “m2m.eclipse.org” or “test.mosquitto.org”, no data was missing.
Do you have any idea what’s going on here? All the setting for mosquitto are default on my Linux.
Thanks a lot!
I would suspect a local nwtwork issue. Did you start mosquitto in verbose mode so that you could be the messages.
rgds
steve
Hi, i configuring MQTT in windows server. How do i change my port number in windows and make MQTT available to public address?
You need to edit the mosquitto.conf file or start mosquitto from the command line using
mosquitto -p 1884
to start mosquitto in port 1884
I am on windows 10. I was able to run mosquitto broker successfully to listen on 1883 following your tutorial. I tested the connection using mosquitto_pub and mosquitto_sub as well. When I tried to test for TLS. I changed the mosquitto cfg file for listening on 8883 and the server certs. Then tried restarting the mosquitto in the services (Local) but it posts the error as “The Mosquitto Broker service on Local Computer started and then stopped. Some services stop automatically if they are not in use by other services or programs.”. On windows command line too, i tried
sc start “mosquitto” followed by sc query “mosquitto”. The sc queries show the STATE as 2 START_PENDING and followed by STATE as 1 STOPPED. Any reason why mosquitto broker couldn’t be started?
I would suspect an error in the config file or it can’t find it.Have you tried staring from the command line as mosquitto -c configfile as it may give you more info.