
MQTT is probably the most common IOT protocol and many IOT service providers and devices provide an MQTT based API.
In the tutorial we are going to use a simple MQTT API to manage several simulated devices.
In order to follow this tutorial you should have a basic understanding of:
- The MQTT protocol- See MQTT Basics
- MQTT Topics – See MQTT Topics
- JSON (JavaScript Object Notation) -See JSON for beginners
IOT Test API and Testing Tools
To learn to use IOT MQTT APIs we also need a suitable simple IOT API to test against, and unfortunately there currently don’t appear to be any available on line.
Therefore I’ve created a basic API using node-red which is available as a flow.
If there is enough interest I will also make it available online.
You will require suitable testing tools.
For MQTT the most common tools are
- Mosquitto_pub and Mosquitto_sub Command line tools.
- MQTT Lens – Chrome extension.
Introducing Our Home Made API
Our API will be used for controlling three simulated IOT devices. These devices are also controllable using the http API.
- A switch
- A light Bulb
- A temperature and humidity sensor.
The Switch
In MQTT endpoints are created using topics.
The topics used are:
myapi/command/device – for commands
myapi/response/device – for responses
There are two ways of sending commands
- Using the topic only as in http Get request
- Using the topic and payload as in the http POST request
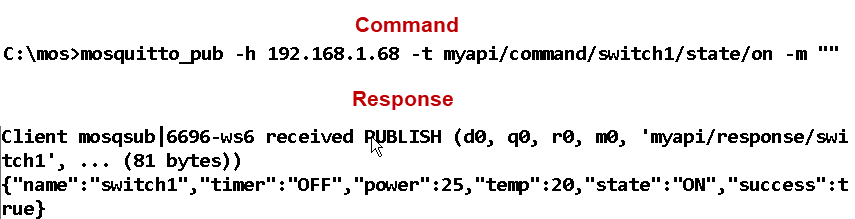
Using The Topic only
Example Turn switch on/off:
myapi/command/switch1/state/on
myapi/command/switch1/state/off
The message payload is blank and will be ignored.
Note: there is an error in the screen shot below it should be command and not commands. However if you have downloaded the API code it may still use commands so try both!
Example:
Using The Topic And Message Payload
Commands are sent using JSON encoded data in the payload.
Example: To turn the switch on use:
myapi/command/switch1
payload data =”{“state”:”ON”}”
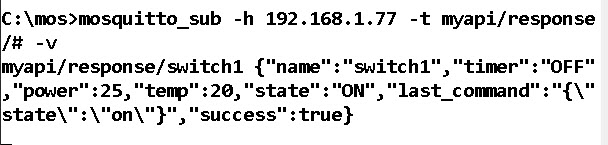
Example using mosquitto_pub –: to turn the switch on/off use:
mosquitto_pub -h 192.168.1.77 -t myapi/command/switch1 -m "{\"state\":\"on\"}"
Note: Notice how the data is delimited using \
To view the response you need to subscribe to the topic myapi/response/#
The response should look like this:
Switch Commands
| Action | Request Type | Topic | Payload |
| Get switch status | Topic Only | myapi/command/switch1 | None |
| Set switch state on | Topic Only | myapi/switch1/state/on | None |
| Set switch state off | Topic Only | myapi/switch1/state/off | None |
| Set switch timer on | Topic Only | myapi/switch1/timer/on | None |
| Set switch timer off | Topic Only | myapi/switch1/timer/off | None |
| Set switch state on | Topic+Payload | myapi/switch1 | “{“state”:”on”}” |
| Set switch state off | Topic+Payload | myapi/switch1 | “{“state”:”off”}” |
| Set switch timer on | Topic+Payload | myapi/switch1 | “{“timer”:”on”}” |
| Set switch timer off | Topic+Payload | myapi/switch1 | “{“timer”:”off”}” |
For the bulb the topic is:
myapi/bulb1
and you can set the state to off and also the colour values to 000000-FFFFFF
Examples:
myapi/bulb1/state/on
myapi/bulb1/colour/ff00ff
Command Table
| Action | Request Type | Topic | Payload |
| Get bulb status | Topic Only | myapi/bulb1 | None |
| Set bulb state on | Topic Only | myapi/bulb1/state/on | None |
| Set bulb state off | Topic Only | myapi/bulb1/state/off | None |
| Set bulb colour | Topic Only | myapi/bulb1/colour/xxxxxx | None |
| Set bulb state on | Topic+Payload | myapi/bulb1 | “{“state”:”on”}” |
| Set bulb state off | Topic+Payload | myapi/bulb1 | “{“state”:”off”}” |
| Set bulb colour | Topic+Payload | myapi/bulb1 | “{“colour”:”xxxxx”}” |
Temperature Sensor
The temperature sensor is mainly read, but you can turn it on and off using both command types.
topic=myapi/command/sensor1/state/on
or
topic=myapi/command/sensor1
payload data =”{“state”:”ON”}”
Resources
Node-Red Flow
If you want to run this demo API on your own node-red platform then the flow is below:

Related Tutorials