
 If you are trying to learn MQTT or are working on a MQTT prject then having access to real time data is very important.
The aim of this project is to create a very simple two state binary sensor, that can be controlled externally using MQTT.
The sensor could be used to simulate real world objects like lights, doors etc that have two states on or off, open or closed etc in IOT projects.
IOT Sensors
Currently real world objects like light bulbs are controlled by a switch.
There is no feedback from the light bulb, that it is on or off, other than the obvious.
However someone in another room wouldn’t know the state of the light bulb .
Because IOT light bulbs will be controllable from anywhere then the state of the bulb should also be available from anywhere.
MQTT is ideal in this scenario as it allows the sensor to be controlled from multiple locations/clients and each one will be aware of the current state.
MQTT Sensor Overview
The sensor subscribes to a control topic and sits in a loop publishing it’s current state, and waiting for a command.
The commands accepted are:
on and off which turn the light on and off. or
Open and Closed if functioning as door sensor
All other commands are ignored and commands are not case sensitive.
The sensor changes its state according to the command, and publishes its current state.
The sensor can operate in:
- Chatty mode were it publishes data at regular intervals.
- Non Chatty were it publishes data only when its status has changed.
It will also publish data on a keep alive interval which is set to be every 5 minutes.
Topics used:
- topic prefix/sensor-name – used to publish sensor state
- topic prefix/sensor-name/control/ -used to change state
The sensor can be called from the command line . Common arguments to pass are:
- sensor name
- topic prefix (optional)
- broker address
- broker port
- chatty or not chatty
- sensor type light or door
- publish interval default =10 seconds in chatty mode
Note: If started from the Python IDE it will create random sensor names.
The sensor publishes with the retain message flag set to True.
Controlling the Sensor
You can use any MQTT client that can publish messages.
The MQTT lens client is ideal for this purpose and so is the MQTT dashboard client (Android APP) as they let you see the messages published by the sender as well as sending messages to the sensor.
I use the mosqquitto_pub tool in the examples below.
Example Usage
Note: You may not need to use the python prefix or may need to use python3 simple-sensor.py (Linux)
Use defaults with ip address
python simple-sensor -b 192.168.1.157
Use defaults with name
python simple-sensor -b ws4
Use Chatty mode -v option don’t need yes or no:
python simple-sensor.py -b 192.168.1.157 -v
Publish every 20 seconds -i option
python simple-sensor.py -b 192.168.1.157 -v -i 20
Set client name to testclient
python simple-sensor.py -b 192.168.1.157 -n testclient
To use as a door sensor open/closed use -s option
python simple-sensor.py -b 192.168.1.157 -n testclient -s
Controlling the sensor using mosquitto_pub tool.
If using as a light sensor.
mosquitto_pub -h 192.168.1.157 sensors/testclient/control -m on
If using as a door sensor
mosquitto_pub -h 192.168.1.157 sensors/testclient/control -m open
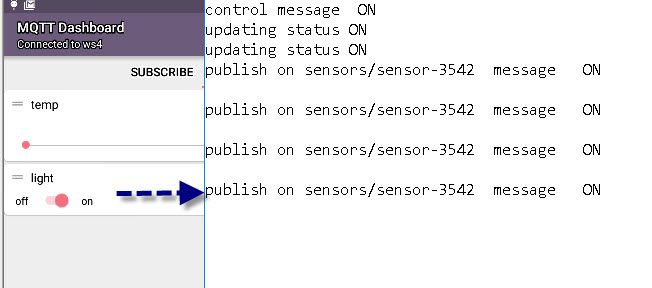
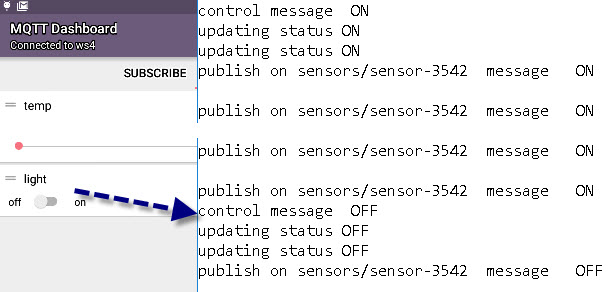
Demo Shots
In the screen shot below I ran the sensor and controlled it using the MQTT dashboard App on my Android tablet.
Download
If you find it useful you are free to use the code in your own projects.

The zip package contains a single file simple-sensor.py.
Comments and Feedback
Was there enough detail in this tutorial for you to follow?
Please help me improve these tutorials by leaving your comments,rating them,asking questions.
Note text below is for the workshop which should be fully available shortly in the meantime the download link above is still valid
For the workshop we have three sensors
- sensor.py #run using IDE door and switch sensor
- sensor1.py #run using IDE door,switch and motion sensor
- sensor2.py #includes code for running from the command line
I have chosen to use three examples as it is easier to explain
Sensor1.py
This is intended to be run via the IDE or equivalent
Sensor2.py
This included code for a motion sensor. The motion sensor sends a 1 to indicate motion followed one second later by a 0.
Sensor.py
As sensor 2 but with the addition of the command line input code and SSL code.This is intended to be run from the command line.
Related Tutorials and Resources:
Hello Steve, thank you for your tutorial
I want to simulate the MQTT protocol with simulation tools How can I do this?
Hi
Take a look here
http://www.steves-internet-guide.com/simple-controllable-mqtt-sensor/
rgds
steve
Hi file isn’t available for download!!
Corrected the link. Here is a direct link
http://www.steves-internet-guide.com/download/simple-controllable-sensor/
If I change this code bloc it is ok ?
def update_status(client,status):
status=status.upper()
if status==states[0]: #Valid status ON
# insert code for ON
client.sensor_status=status #update
print(“ON -> updating status “,client.sensor_status)
if status==states[1]: #Valid status OFF
# insert code for OFF
client.sensor_status=status #update
print(“OFF-> updating status “,client.sensor_status)
Hi
Not sure as the simulator is for receiving commands not sending them. If you send the the code you have using the ask steve page I will take a look
Rgds
Steve
Hi Steve,
Just to let you know that I succeed to solve it with your original code and just few changes; inserting the commands – for rpi gpio pins relays on/off – and also adding another 2 command states for request just update the sensor status when relays are triggered by another script. It seem all it is working OK.
I wanted to send you the new code but I can’t find attachment options.
Thank you for your super good tutorials, it keeps me busy on computer learning and experimenting all day&night long.
Best Regards
L.