
 In this tutorial we look at publishing messages using the node.js MQTT client.
When you publish a message in MQTT you need to specify the
- Topic
- Message
- Retain
- QOS (0,1,2)
- Properties (MQTT v5)
Depending on the QOS the published message will receive an acknowledgement from the broker (QOS=1,2).
All MQTT clients have defaults for the retain, qos and properties which are usually 0,false,null.
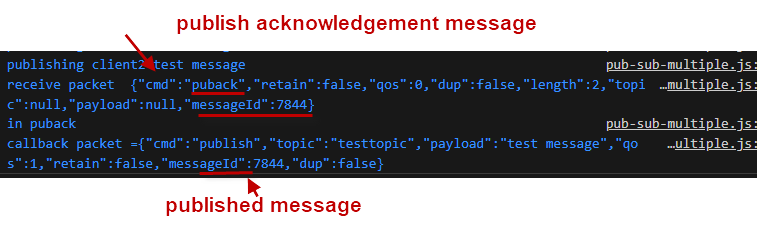
When publishing with a QOS of 1 or 2 the message is assigned a messageId which can be used in conjunction with the PubAck messageId to determine if the message has been received by the broker.
If the messageId in the outgoing message matches the messageId in the received PubAck message then the message was received ok. This shown below with the messageId of 7844:
MQTT Publish API
To publish a message use:
client.publish(topic, message, [options], [callback])
the options and callback parameters are optional.
Options include retain message flag, qos etc.
e.g.
client.publish("testtopic", "test message")
and with options:
var options={
retain:true,
qos:1};
client.publish("testtopic", "test message",options)
The callback can be used to:
- Test for success
- Capture the published messageId.
Events
To capture the PubAck we need to listen to the packetreceive event.
Timing
Because node.js uses asynchronous functions you need to be careful with timings.
For example the process
- connect
- publish
May not work because the publish occurs before the connection is complete. In other languages we simply wait for the connection to complete like this:
- connect
- wait for connection
- publish
but in node.js we cannot do this.
Although we can test for the connection to be established before we publish using:
if (client.connected==true){
client.publish("testtopic", "test message",options)
}
Therefore if you want to simply- connect, publish and disconnect, then you should call the publish in the on_connect callback.
This way you know that you are connected before you publish.
client.on("connect",function(){
	console.log("connected  "+ client.connected);
    let topic="test_topic";
    let options={qos:1};
    msg="test message";
    client.publish(topic,msg,options);

	})
If you need to publish at regular intervals e.g when sending status information then use the setInterval function as shown below.
var message="test message";
var topic="testtopic";
//publish every 5 secs
var timer_id=setInterval(function(){publish(topic,message,options);},5000);

//publish function
function publish(topic,msg,options){
  console.log("publishing",msg);
if (client.connected == true){
  client.publish(topic,msg,options);
}
In this situation the connection test does work
The Msg Payload
You can send a string,JSON data and a buffer, so.
msg=string
msg=JSON string
msg=buffer
To send integer or float values they must first be converted to a string using either:
JSON.stringify(value) or value.toString();
e.g take the number(float) 2.31 we can use:
 let n=2.32;
 msg=JSON.stringify(n);
and
 let n=2.32;
 msg=n.toString();
To send boolean values true/false use JSON we convert to JSON data.
let msg=JSON.stringify(true);
For a buffer use the Buffer module
  msg = Buffer.from('abce');
  console.log("type="+ typeof msg);
and then publish as normal.
Using the Publish Callback
When calling the publish method you can send a callback which is called when the publish completes.
By complete it means that the Acknowledgement process is complete (QOS of 1 or2)
The code I use is below
client.publish(topic,msg,options,puback);
Where puback is the callback function which we define in the example below:
function puback(error,response)
{
	console.log("in puback");
	console.log("callback packet =" +JSON.stringify(response));
    if (error) {
      console.error(error)
    }
This produces the following output when publishing a test message:
in puback
callback packet ={"cmd":"publish","topic":"testtopic","payload":"test message","qos":1,"retain":false,"messageId":64009,"dup":false}
The packet we see is the packet that is being sent by the publish.
To view the acknowledgement we monitor the packetreceive event.
client.on("packetreceive",function(packet){
	console.log("receive packet  "+ JSON.stringify(packet));
	})
This produces the following output:
receive packet {"cmd":"puback","retain":false,"qos":0,"dup":false,"length":2,"topic":null,"payload":null,"messageId":64009}
Publishing Using Topic Aliases
MQTTv5 supports topic aliases. The idea behind the topic alias is to reduce the size of the published packet by using a shorter topic.
To use topic alias you fist nee to set the alias using a publish and then you can publish using the topic alias and an empty topic field.
Here is the code:
//first published message asigns the topic alias of 1 to the topic //testtopic

var topic="testtopic";
	options.properties={topicAlias:1};
and subsequent messages set the topic to “” and use the topic alias.
//first published message asigns the topic alias of 1 to the topic //testtopic

var topic="";
	options.properties={topicAlias:1};
Note: To receive messages you need to subscribe to the topic(testtopic) and not the topic alias.
You should also note that topic aliases are only valid for that client connections. Other clients can set there own topic aliases.
In addition the server usually limits topic aliases (default=10) and a topic alias of 0 is not allowed.
Publish Examples
Publish message with qos=1 and retain flag set
if (client.connected == true){
var options={
		retain:true,
		qos:1};

msg="test message string";
console.log("publishing",msg);
client.publish(topic,msg,options);
}
Publish JSON message with QOS=1
if (client.connected == true){

var options={
		qos:1};

let data={volts:240,current:1.2};
msg =JSON.stringify(data);
console.log("publishing",msg);
client.publish(topic,msg,options);
}
Publish message with messageExpiryInterval set
if (client.connected == true){

var options={
		qos:1,
	properties:
{
	messageExpiryInterval:120
}
};

let data={volts:240,current:1.2};
msg =JSON.stringify(data);
console.log("publishing",msg);
client.publish(topic,msg,options);
}
Note: for this to work you must set the client connection to version 5:
let r = Math.floor(Math.random() * 10000);
var options={
	clientId:"mqttjs-"+r,
	protocolVersion:5,
	port:1883
}
let broker="mqtt://192.168.1.23";
var client  = mqtt.connect(broker,options);
Related tutorials and resources:
- Connecting to an MQTT Broker Using the Node.js Client
- Using the Node.js MQTT Client-Starting Guide
- How MQTT Works -Beginners Guide
- MQTT Publish and Subscribe Beginners Guide