Introduction
Controlling Devices Using MQTT and PythonOnline tutorial and downloadable Project workbook where we use MQTT to control a python script.
The script is a simple sensor but I have used the same technique to control many other python scripts.What it covers:
- Basic topic design
- Basic MQTT API creation
Prerequisites You should be familiar with the Paho MQTT client
Project
MQTT can not only be used for collecting sensor data it can also be used for controlling devices.
In this mini workshop we will be creating a device in Python that can be controlled using MQTT.
Although our sample device is a simple sensor I have used the same idea and similar code to add MQTT control to Python command line control scripts.
We will start the workshop by designing a topic structure and then we will create the Python code.
Topic Structure
Before you start it is important to decide on a topic structure.
The structure I normally use for commands looks like this:
topic base + cmnd+ device + device_command +command value
Notice the device_command and command value at the end. This is the actual command you want to issue to the device e.g power to turn the power on/off or timer to set the time.
In a simple case were the device can only accept a single command the device_command can be omitted.
In this workshop the actual command value e.g on or off is part of the topic. For more complex data it would be part of the payload and usually JSON encoded.
Sending a command results in a response from the device. The topic response from the device would be published on
topic base + response + device
In addition the device might also send status data and readings which in turn would use their own topics e.g.
- topic base + telemetry+ device
- topic base + status+ device
You should notice the topic structure is chosen as it allows you to subscribe to the topic base and receive all data and then to easily filter commands from responses.
Example topics:
- house/cmnd/outside-light or house/cmnd/outside-light/power
- house/response/outside-light
- house/status/outside-light/state
- house/status/outside-light/info
- house/telemetry/outside-light
Friendly Name vs Device ID
Most IOT devices will come with a device ID which can’t be changed and uniquely identifies the device.
When setting up the device then it is common to assign and use a friendly name that is more descriptive e.g main light.
Alternative or Backup Names
A device can also have an alternative name which allows you to control the device in case something happens to the original friendly name. For example if a device rename goes wrong.
Device Groups
It is common to group devices into control groups so that you can, for example, turn all lights off and on with a single command.
So we could put all of our lights in the lights group and turn them on or off with a single command to the lights group.
Command in Payload or Topic
To turn our lights on/off we could issue the command value as part of the topic so we would have the structure:
topic base + cmnd+ device +command_value
or
topic base + cmnd+ device +command+command_value
In the case of a simple switch the command values would be on and off
Example:
house/cmnd/outside-light/off
or
house/cmnd/outside-light/power/off
Alternatively the command can be sent in the payload.
Simple data can be sent in the topic but more complex data like JSON data is sent in the payload.
In this workshop we will implement the topic method.
The response contains the command in the payload.
Python Code
The python code needs to:
Subscribe to the topic to receive commands
Analyse the received topic and extract the device, device command, and command value .
Check that the command is valid
Execute the command, and update the status and send a response.
The topic structure Used in the code is shown below and is at the top of the code
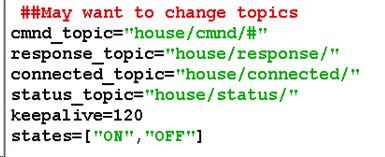
In our Python code this is starts in the on_message callback. The on_message callback calls the message handler.

The Message hander extracts the various elements from the topic and checks that the command value sent is valid.
If valid, it calls two functions. These functions update the status and send a response.
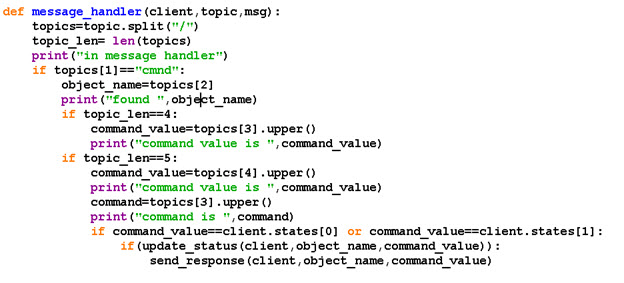
The functions are shown below:
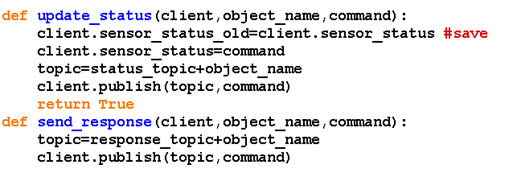
You should note that the code currently doesn’t check the device name and so it will work for any device name.
It will also work with a device_command and without one.
The house/connected topic is not mandatory but I use it so that it is easy to identify connected clients by simply subscribing to this topic.
The device publishes a retained message (value=1) on this topic when it connects.

Before it disconnects it should publish a 0 on this topic. For completeness the will message should be set to do this when the connection fails.
Testing
The sample code is available below:
I prefer to use the mosquitto_sub and pub tools for testing but you can use MQTTBox or any other tool of your choice.
You will need to subscribe to house/# to see the commands responses and status messages.
You then publish on
house/cmnd/main-light/on
Or
house/cmnd/main-light/power/on
To turn the light on and use off to turn it off. These states are checked in the code but the case isn’t important. Example below:

Adding Device Name Support
In the case of a simple sensor there will be only a single name but as mentioned earlier we will have an hard coded name and friendly name and also group names.
In addition we will also need to be able to change the device friendly name, and also add/remove the device from groups.
So we will start with hard coded values.
Device name= 111111
Device friendly name= lounge-light
backup name=sensor/device name
group_names =[“lights”,”main-lights”]
Before updating the status and executing commands the device name needs to be checked. The function is shown below

In the handler we check if the name is valid and ignore the command if it isn’t
Issuing Other Commands
Besides simply turning the switch on and off we might want to add the switch to a group or change its name.
In order to do this we need to use a topic structure like this
topic base + cmnd + device + device_command
example
house/cmnd/main-light/power/on
For each command we will need to create a function. Below is the code for three functions:
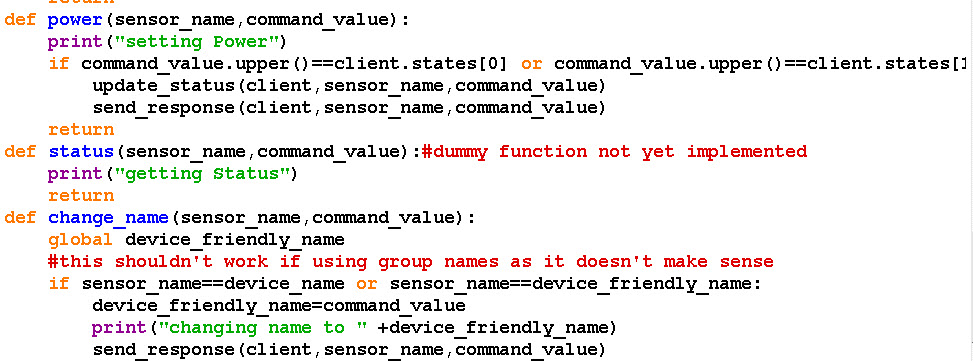
To change the friendly name we need to add another command which we will call change_name and to change it we set the value to the new name so we have a command of the form:
house/cmnd/lounge-light/change_name/new_name
In the message handler we need to extract the command and call it if it is valid.
The message handler function has been re-coded to do this and note that we only need to look for the command if we have the required topic fields.
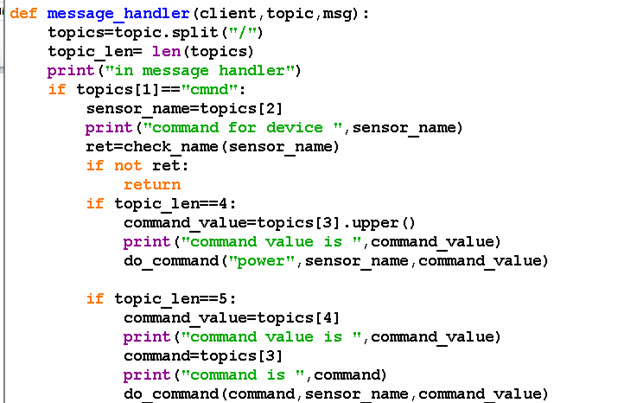
The do command function checks and calls the command if it is valid.

All of the commands are contained in the commands dictionary which needs to be declared after the functions have been declared
The complete code is in the file device1.py and you should now be able to change the friendly name and change it back again.
Script Source code Download
Questions That you can answer by trying
Q1- Can you change the sensor name using the device name
Q2- Can you change the sensor name using the group name
Q3 -Can you change the sensor name using the device friendly name
Q4- Should you be able to control the device using the backup friendly name?
Answers are below
 This workshop is also available as a pdf, and includes the demo scripts on my buy me a coffee page
Continue to part 2
Related tutorials and Resources
- Using MQTT APIs For IOT -Beginners Guide
- Checking Active MQTT Client Connections
- Simple Python MQTT Sensor Simulator
- MQTT Topic and Payload Design Notes
Answers
1- yes
2- no
3- yes
4- Yes


Hi Steve,
Thank you for sharing your knowledge since a long time. It is by reading your articles since a few years that I got interested, learned and I have used Mosquitto broker and Node-Red. Thank you very much.
I believe there is something like a cut and paste (not updated) in:
Command and payload or topic –> example:
house/cmnd/outside-light/off and house/cmnd/outside-light/power/on
or
house/cmnd/outside-light/off and house/cmnd/outside-light/power/on.
Tks for that I have changed it slightly so hopefully it reads better.
rgds
steve
An interesting set of workshop notes. I am familiar with using MQTT using the Mosquitto broker on a variety of Linux boxes and the PubSubclient library on ESP devices. I also use the excellent MQTTexplorer to view MQTT traffic (subscribe) and to publish to topics. However, what I am not clear about is what editor you use, could I use Visual Studio Code for example, and what device the python code would run on to make a fully working unit. In other words what would be needed to make a practical, working, python based sensor or controller? For me, at least, the device should be something other than the unobtainable Raspberry Pi’s.
Pi is the obvious one but apparently arduino boards support micropython
https://docs.arduino.cc/learn/programming/arduino-and-python
The sensor itself could be c based and use MQTT for control. I choose Python for the entire project because I am very familiar with it.
I will look at an Arduino version.
For me the most important point was the use of MQTT as the control protocol as traditionally it is http on all of the sensors/switches currently available.
I used this idea on a PLC python script that was supplied by the manufacturer to control the PLC from the command line and converted it into remote control via MQTT.
Nice to hear from you again Bob. Hope everything is going well .
Rgds
Steve